|
- 按键认证大神
- 8648672
- 35
- 11
- 573 朵
- 299 个
- 159 个
- 0
- 2022-03-06
|
1#
t
T
发表于 2022-05-09 12:03
|
|只看楼主
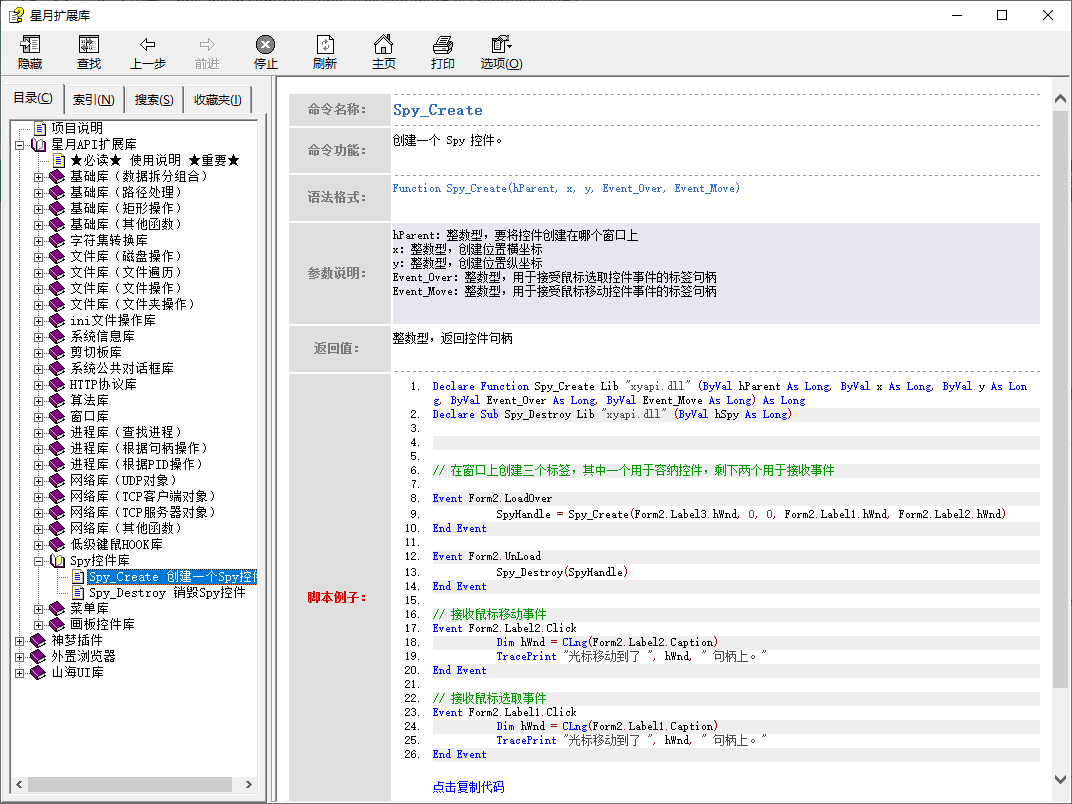
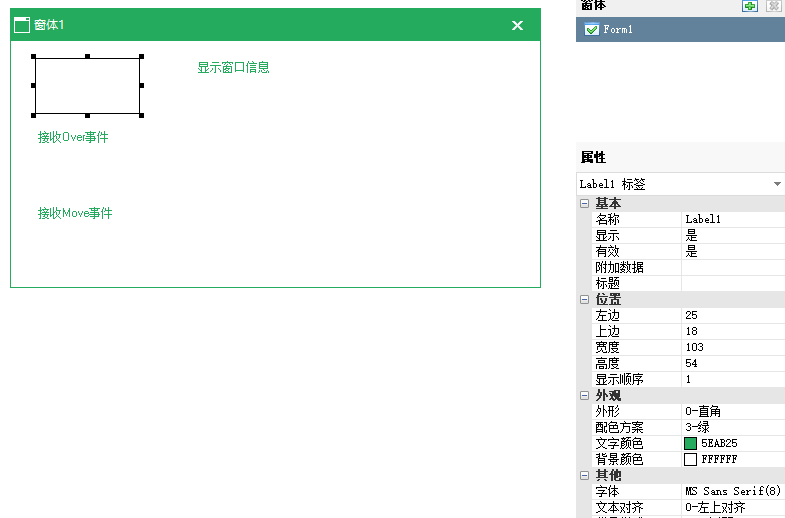
我们在开发游戏脚本的时候,经常需要管理想要操作的窗口,一般来说,这种功能都是使用窗口查找和遍历来实现的。 但偶尔也有需求是希望由用户来自行选择想要操作的窗口,这种功能用按键实现起来难度不小,今天就给大家展示一下怎么做。 基于按键X的星月扩展库提供了一些补充插件,来强化按键精灵的功能,对星月扩展库感兴趣的小伙伴可以看原贴: http://bbs.anjian.com/showtopic-664233-1.aspx最终实现效果如下:   通过查询星月扩展库帮助文档,我们可以知道使用 [url=]Spy_Create[/url] 命令可以创建一个 Spy 控件,这个控件的功能就是提供一个拖动定位窗口的能力。   它有5个参数,第一个参数是希望把这个控件创建到什么控件里面,可以指定为窗口句柄,或者其他控件的句柄(有时候会希望把Spy控件创建到选项卡控件里面) 第二个参数和第三个参数是控件创建的坐标,因为不是所见即所得设计的,计算坐标很麻烦,这里教大家一种简单的方法,创建一个标签控件,然后把Spy控件创建到标签控件里面,然后这两个参数设置为0,这样拖动标签控件的位置,就可以给Spy控件定位了。 第四个参数和第五个参数用于接收事件的标签控件,Spy控件操作的时候,会通知按键精灵窗口,通过设置标签控件的值并点击的方式,这样就可以和按键精灵X实现数据交换了,第四个参数负责鼠标拖动后松开的事件(最终定位的窗口);第五个参数负责鼠标移动时窗口变化的事件(划过窗口)。 需要注意的是,这里的 Spy 控件支持识别子窗口,所以鼠标划过一个按钮、输入框之类的,都会接收到事件,然后鼠标松开最终定位的窗口和划过的窗口,得到的都是子窗口句柄,如果要定位子窗口,这个句柄直接用就可以了,如果要定位游戏主窗口,可以用 [url=]Window_GetRoot[/url] 命令获取顶级窗口句柄。 接下来我们做一个最小范例,来体会一下这个控件的用法: 第一步:创建4个标签控件,第二个和第三个标签控件的显示属性设置为否,第一个标签控件的标题清空,注意不要太小,不然放不下Spy控件,第四个标签控件不用特别改,弄大一点方便显示内容,如下图所示   第二步:添加星月扩展库的xyapi定义: - // Spy控件库
- Declare Function Spy_Create Lib "xyapi.dll" (ByVal hParent As Long, ByVal x As Long, ByVal y As Long, ByVal Event_Over As Long, ByVal Event_Move As Long) As Long
- Declare Sub Spy_Destroy Lib "xyapi.dll" (ByVal hSpy As Long)
- // 窗口库
- Declare Function Window_GetCaption Lib "xyapi.dll" (ByVal hWnd As Long) As String
- Declare Function Window_GetClassName Lib "xyapi.dll" (ByVal hWnd As Long) As String
- Declare Function Window_GetRoot Lib "xyapi.dll" (ByVal hWnd As Long) As Long
- Declare Function Window_E2H Lib "xyapi.dll" (ByVal Parent As Long, ByVal ClassName As String, ByVal Eid As Long) As Long
- Declare Function Window_H2E Lib "xyapi.dll" (ByVal Parent As Long, ByVal ClassName As String, ByVal Eid As Long) As Long
- Declare Function Window_Scan Lib "xyapi.dll" (ByVal Mask As Long, ByVal ClassName As String, ByVal Caption As String, ByVal Style As Long, ByVal ExStyle As Long, ByVal PID As Long, ByVal Thread As Long, ByVal bk As Any, ByVal Param As Long) As Long
- Declare Function Window_List Lib "xyapi.dll" (ByVal Mask As Long, ByVal ClassName As String, ByVal Caption As String, ByVal Style As Long, ByVal ExStyle As Long, ByVal PID As Long, ByVal Thread As Long) As String
- Declare Function Window_Find Lib "xyapi.dll" (ByVal Mask As Long, ByVal ClassName As String, ByVal Caption As String, ByVal Style As Long, ByVal ExStyle As Long, ByVal PID As Long, ByVal Thread As Long) As Long
- Declare Function Window_ScanChild Lib "xyapi.dll" (ByVal Parent As Long, ByVal Mask As Long, ByVal ClassName As String, ByVal Caption As String, ByVal Style As Long, ByVal ExStyle As Long, ByVal PID As Long, ByVal Thread As Long, ByVal bk As Any, ByVal Param As Long) As Long
- Declare Function Window_ListChild Lib "xyapi.dll" (ByVal Parent As Long, ByVal Mask As Long, ByVal ClassName As String, ByVal Caption As String, ByVal Style As Long, ByVal ExStyle As Long, ByVal PID As Long, ByVal Thread As Long) As String
- Declare Function Window_FindChild Lib "xyapi.dll" (ByVal Parent As Long, ByVal Mask As Long, ByVal ClassName As String, ByVal Caption As String, ByVal Style As Long, ByVal ExStyle As Long, ByVal PID As Long, ByVal Thread As Long) As Long
- Declare Function Window_GetPID Lib "xyapi.dll" (ByVal hWin As Long) As Long
- Declare Function Window_GetTID Lib "xyapi.dll" (ByVal hWin As Long) As Long
- Declare Function Window_GetPath Lib "xyapi.dll" (ByVal hWin As Long) As String
- Declare Function Window_FormPoint Lib "xyapi.dll" (ByVal x As Long, ByVal y As Long) As Long
- Declare Function Window_FormMouse Lib "xyapi.dll" () As Long
- Declare Function Window_ConvS2C Lib "xyapi.dll" (ByVal hWin As Long, ByVal x As Long, ByVal y As Long) As Long
- Declare Function Window_ConvC2S Lib "xyapi.dll" (ByVal hWin As Long, ByVal x As Long, ByVal y As Long) As Long
第三步:添加 xyapi.dll 到附件目录。 第四步:在窗口的载入完成事件和销毁事件里写入代码,创建和销毁 Spy 控件: - Global SpyHandle
- Event Form1.LoadOver
- SpyHandle = Spy_Create(Form1.Label1.hWnd, 0, 0, Form1.Label2.hWnd, Form1.Label3.hWnd)
- TracePrint SpyHandle
- End Event
- Event Form1.UnLoad
- Spy_Destroy(SpyHandle)
- End Event
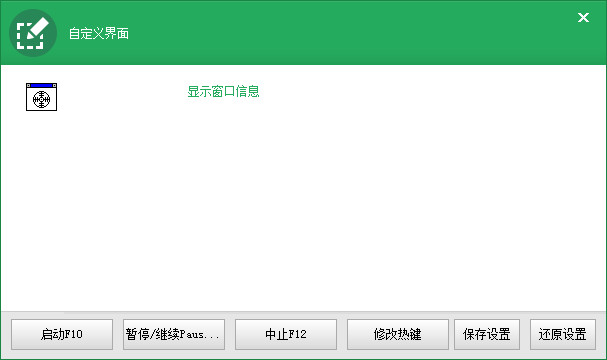
这里 Spy_Create 命令用于创建 Spy控件,Spy_Destroy用于销毁 Spy控件,全局变量 SpyHandle 用于保存 Spy控件的句柄。 运行脚本,展示效果如下:   现在 Spy 控件可以操作和拖动了,但是不会有任何反应,因为我们还没有处理它的事件。 第五步:完善 Spy 控件的事件,这里我们用比较简单的方法直接把数据输出出来,实际上能做的还有很多,比如实现一个 Spy 工具,后面我们会继续讲: - // Event_Spy_Over
- Event Form1.Label2.Click
- Dim G_Spy_hCon = CLng(Form1.Label2.Caption)
- Dim G_Spy_hWin = Window_GetRoot(G_Spy_hCon)
- MsgBox "窗口句柄:" & G_Spy_hWin & "\r\n" & "控件句柄:" & G_Spy_hCon
- End Event
- // Event_Spy_Move
- Event Form1.Label3.Click
- Dim hWnd = CLng(Form1.Label3.Caption)
- Form1.Label4.Caption = "窗口句柄:" & hWnd
- End Event
再次运行,拖动 Spy 控件,现在可以响应事件了。   接下来直接上 Spy 控件的源代码: - // Spy控件库
- Declare Function Spy_Create Lib "xyapi.dll" (ByVal hParent As Long, ByVal x As Long, ByVal y As Long, ByVal Event_Over As Long, ByVal Event_Move As Long) As Long
- Declare Sub Spy_Destroy Lib "xyapi.dll" (ByVal hSpy As Long)
- // 剪贴板库
- Declare Function Clip_GetText Lib "xyapi.dll" () As String
- Declare Function Clip_SetText Lib "xyapi.dll" (ByVal sText As String, ByVal uSize As Long) As Long
- // 窗口库
- Declare Function Window_GetCaption Lib "xyapi.dll" (ByVal hWnd As Long) As String
- Declare Function Window_GetClassName Lib "xyapi.dll" (ByVal hWnd As Long) As String
- Declare Function Window_GetRoot Lib "xyapi.dll" (ByVal hWnd As Long) As Long
- Declare Function Window_E2H Lib "xyapi.dll" (ByVal Parent As Long, ByVal ClassName As String, ByVal Eid As Long) As Long
- Declare Function Window_H2E Lib "xyapi.dll" (ByVal Parent As Long, ByVal ClassName As String, ByVal Eid As Long) As Long
- Declare Function Window_Scan Lib "xyapi.dll" (ByVal Mask As Long, ByVal ClassName As String, ByVal Caption As String, ByVal Style As Long, ByVal ExStyle As Long, ByVal PID As Long, ByVal Thread As Long, ByVal bk As Any, ByVal Param As Long) As Long
- Declare Function Window_List Lib "xyapi.dll" (ByVal Mask As Long, ByVal ClassName As String, ByVal Caption As String, ByVal Style As Long, ByVal ExStyle As Long, ByVal PID As Long, ByVal Thread As Long) As String
- Declare Function Window_Find Lib "xyapi.dll" (ByVal Mask As Long, ByVal ClassName As String, ByVal Caption As String, ByVal Style As Long, ByVal ExStyle As Long, ByVal PID As Long, ByVal Thread As Long) As Long
- Declare Function Window_ScanChild Lib "xyapi.dll" (ByVal Parent As Long, ByVal Mask As Long, ByVal ClassName As String, ByVal Caption As String, ByVal Style As Long, ByVal ExStyle As Long, ByVal PID As Long, ByVal Thread As Long, ByVal bk As Any, ByVal Param As Long) As Long
- Declare Function Window_ListChild Lib "xyapi.dll" (ByVal Parent As Long, ByVal Mask As Long, ByVal ClassName As String, ByVal Caption As String, ByVal Style As Long, ByVal ExStyle As Long, ByVal PID As Long, ByVal Thread As Long) As String
- Declare Function Window_FindChild Lib "xyapi.dll" (ByVal Parent As Long, ByVal Mask As Long, ByVal ClassName As String, ByVal Caption As String, ByVal Style As Long, ByVal ExStyle As Long, ByVal PID As Long, ByVal Thread As Long) As Long
- Declare Function Window_GetPID Lib "xyapi.dll" (ByVal hWin As Long) As Long
- Declare Function Window_GetTID Lib "xyapi.dll" (ByVal hWin As Long) As Long
- Declare Function Window_GetPath Lib "xyapi.dll" (ByVal hWin As Long) As String
- Declare Function Window_FormPoint Lib "xyapi.dll" (ByVal x As Long, ByVal y As Long) As Long
- Declare Function Window_FormMouse Lib "xyapi.dll" () As Long
- Declare Function Window_ConvS2C Lib "xyapi.dll" (ByVal hWin As Long, ByVal x As Long, ByVal y As Long) As Long
- Declare Function Window_ConvC2S Lib "xyapi.dll" (ByVal hWin As Long, ByVal x As Long, ByVal y As Long) As Long
- // 窗口加载
- Global SpyHandle
- Event Form1.LoadOver
- Form1.Grid1.SetItemText(1 , 0, "根窗口句柄")
- Form1.Grid1.SetItemText(2 , 0, "根窗口标题")
- Form1.Grid1.SetItemText(3 , 0, "根窗口类名")
- Form1.Grid1.SetItemText(4 , 0, "根窗口类枚举")
- Form1.Grid1.SetItemText(5 , 0, "父窗口句柄")
- Form1.Grid1.SetItemText(6 , 0, "父窗口标题")
- Form1.Grid1.SetItemText(7 , 0, "父窗口类名")
- Form1.Grid1.SetItemText(8 , 0, "父窗口类枚举")
- Form1.Grid1.SetItemText(9 , 0, "所属进程 PID")
- Form1.Grid1.SetItemText(10, 0, "所属线程 TID")
- SpyHandle = Spy_Create(Form1.Label3.hWnd, 0, 0, Form1.Label1.hWnd, Form1.Label2.hWnd)
- TracePrint SpyHandle
- End Event
- Event Form1.UnLoad
- Spy_Destroy(SpyHandle)
- End Event
- // Event_Spy_Over
- Declare Function GetParent Lib "user32" Alias "GetParent" (ByVal hwnd As Long) As Long
- Global G_Spy_hCon, G_Spy_hWin
- Event Form1.Label1.Click
- G_Spy_hCon = CLng(Form1.Label1.Caption)
- G_Spy_hWin = Window_GetRoot(G_Spy_hCon)
- Dim hParent = GetParent(G_Spy_hCon)
- Dim sClassName = Window_GetClassName(G_Spy_hCon)
- Form1.Grid1.SetItemText(1 , 1, G_Spy_hWin)
- Form1.Grid1.SetItemText(2 , 1, Window_GetCaption(G_Spy_hWin))
- Form1.Grid1.SetItemText(3 , 1, Window_GetClassName(G_Spy_hWin))
- Form1.Grid1.SetItemText(4 , 1, Window_H2E(G_Spy_hWin, sClassName, G_Spy_hCon))
- Form1.Grid1.SetItemText(5 , 1, hParent)
- Form1.Grid1.SetItemText(6 , 1, Window_GetCaption(hParent))
- Form1.Grid1.SetItemText(7 , 1, Window_GetClassName(hParent))
- Form1.Grid1.SetItemText(8 , 1, Window_H2E(hParent, sClassName, G_Spy_hCon))
- Form1.Grid1.SetItemText(9 , 1, Window_GetPID(G_Spy_hCon))
- Form1.Grid1.SetItemText(10, 1, Window_GetTID(G_Spy_hCon))
- Form1.InputBox5.Text = """" & Window_GetClassName(G_Spy_hWin) & """"
- Form1.InputBox6.Text = """" & Window_GetCaption(G_Spy_hWin) & """"
- Form1.InputBox15.Text = """" & Window_GetClassName(G_Spy_hCon) & """"
- Form1.InputBox16.Text = Window_H2E(G_Spy_hWin, sClassName, G_Spy_hCon)
- Form1.InputBox11.Text = """" & Window_GetClassName(G_Spy_hCon) & """"
- Form1.InputBox12.Text = """" & Window_GetCaption(G_Spy_hCon) & """"
- End Event
- // Event_Spy_Move
- Event Form1.Label2.Click
- Dim hWnd = CLng(Form1.Label2.Caption)
- Form1.InputBox1.Text = hWnd
- Form1.InputBox2.Text = Window_GetCaption(hWnd)
- Form1.InputBox3.Text = Window_GetClassName(hWnd)
- Form1.InputBox4.Text = Window_GetPath(hWnd)
- End Event
- // 重新获取控件枚举值
- Event Form1.Button1.Click
- Form1.InputBox16.Text = Window_H2E(G_Spy_hWin, Form1.InputBox15.Text, G_Spy_hCon)
- End Event
- // 生成代码
- Event Form1.Button2.Click
- // 生成查找窗口代码
- Dim Script = "Dim hWin = Window_Find("
- Dim Flag = iif(CBool(Form1.CheckBox1.Value), CLng(Form1.ComboBox1.GetItemData(Form1.ComboBox1.ListIndex)), 0)
- Flag = Flag + iif(CBool(Form1.CheckBox2.Value), CLng(Form1.ComboBox2.GetItemData(Form1.ComboBox2.ListIndex)), 0)
- Flag = Flag + iif(CBool(Form1.CheckBox3.Value), CLng(Form1.ComboBox3.GetItemData(Form1.ComboBox3.ListIndex)), 0)
- Flag = Flag + iif(CBool(Form1.CheckBox4.Value), CLng(Form1.ComboBox4.GetItemData(Form1.ComboBox4.ListIndex)), 0)
- Flag = Flag + iif(CBool(Form1.CheckBox5.Value), 1, 0)
- Flag = Flag + iif(CBool(Form1.CheckBox6.Value), 2, 0)
- Script = Script & Flag & ", "
- Script = Script & iif(CBool(Form1.CheckBox1.Value), Form1.InputBox5.Text, """""") & ", "
- Script = Script & iif(CBool(Form1.CheckBox2.Value), Form1.InputBox6.Text, """""") & ", "
- Script = Script & iif(CBool(Form1.CheckBox3.Value), Form1.InputBox7.Text, "0") & ", "
- Script = Script & iif(CBool(Form1.CheckBox4.Value), Form1.InputBox8.Text, "0") & ", "
- Script = Script & iif(CBool(Form1.CheckBox5.Value), Form1.InputBox9.Text, "0") & ", "
- Script = Script & iif(CBool(Form1.CheckBox6.Value), Form1.InputBox10.Text, "0") & ")\r\n"
- // 生成查找控件代码
- If Form1.CheckBox11.Value = 0 Then
- Select Case Form1.TabControl2.Tab
- Case 0
- Script = Script & "Dim hCon = Window_E2H(hWin, "
- Script = Script & Form1.InputBox15.Text & ", "
- Script = Script & Form1.InputBox16.Text & ")\r\n"
- Case 1
- Script = Script & "Dim hCon = Window_FindChild(hWin, "
- Flag = iif(CBool(Form1.CheckBox7.Value), CLng(Form1.ComboBox5.GetItemData(Form1.ComboBox5.ListIndex)), 0)
- Flag = Flag + iif(CBool(Form1.CheckBox8.Value), CLng(Form1.ComboBox6.GetItemData(Form1.ComboBox6.ListIndex)), 0)
- Flag = Flag + iif(CBool(Form1.CheckBox9.Value), CLng(Form1.ComboBox7.GetItemData(Form1.ComboBox7.ListIndex)), 0)
- Flag = Flag + iif(CBool(Form1.CheckBox10.Value), CLng(Form1.ComboBox8.GetItemData(Form1.ComboBox8.ListIndex)), 0)
- Script = Script & Flag & ", "
- Script = Script & iif(CBool(Form1.CheckBox7.Value), Form1.InputBox11.Text, """""") & ", "
- Script = Script & iif(CBool(Form1.CheckBox8.Value), Form1.InputBox12.Text, """""") & ", "
- Script = Script & iif(CBool(Form1.CheckBox9.Value), Form1.InputBox13.Text, "0") & ", "
- Script = Script & iif(CBool(Form1.CheckBox10.Value), Form1.InputBox14.Text, "0") & ", 0, 0)\r\n"
- End Select
- End If
- Form1.InputBox17.Text = Script
- End Event
- // 复制代码
- Event Form1.Button3.Click
- Clip_SetText(Form1.InputBox17.Text, 0)
- MsgBox "代码复制成功!"
- End Event
其实大同小异,无非是控件用的多了一点,获取的信息比刚才的最小范例丰富了一点,各位可以对照 xyapi 的文档查看每个函数的功能,整体上这段代码还是很简单的,入门即可实现这些效果。 Spy工具成品小精灵下载:  - spy.zip (, 下载次数:301)
Spy控件最小演示工程下载:  - Spymini.zip (, 下载次数:200)
Spy工具完整源代码下载:  - spytool.zip (, 下载次数:270)
|


 闽公网安备 35010002000112号